GroveStreams Java - Empty Organization
This tutorial will walk you through the creation of a user account, an organization, a component with one stream and a feed that uploads "Hello world! The current time is: ___" every 10 seconds.Basic knowledge of the Java programming language is required.
This tutorial is an advanced tutorial and does not use any GroveStreams blueprints. It creates an organization without anything modeled so that you can get familiar with modeling components, streams and sample frequency cycles. Creating an organization with a blueprint greatly simplifies GroveStreams usage and should be leveraged as you become more familiar with GroveStreams.
Step 1: Create a Free User Account
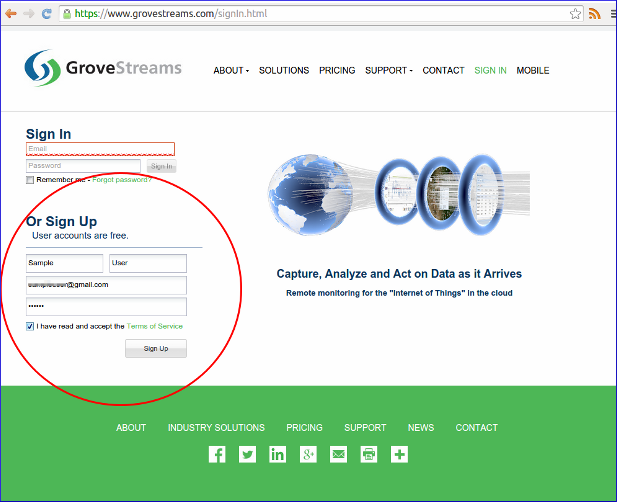
Open a browser and navigate to the GroveStreams registration page and sign up.
After creating a free user account, log into GroveStreams.
Step 2: Create an Organization

Select Yes to create a new organization.
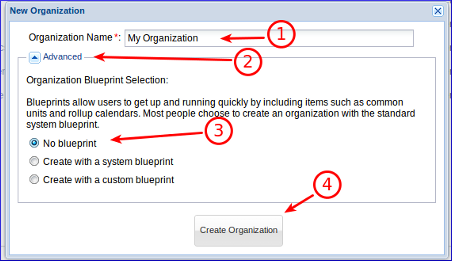
1. Enter a name for the new organization. Any name is allowed.
2. Expand the Advanced section.
3. Selct No blueprint. This will create an empty organization with no existing units, cycles, or other entities so that basic modeling can be learned. If you were to select the system standard blueprint (the default), you could skip the manual creation of units, cycles, and rollup calendars.
4. Click Create Organization.
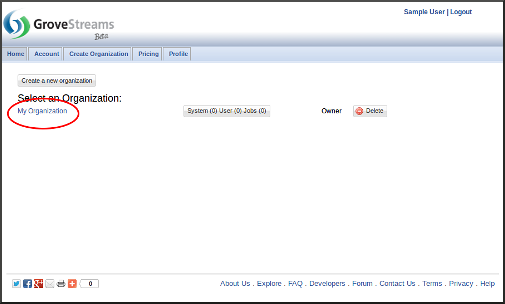
Select your new organization by clicking on its name.
You will be directed to the organization's observation studio page.
Step 3: Create a Hello World Component and Stream
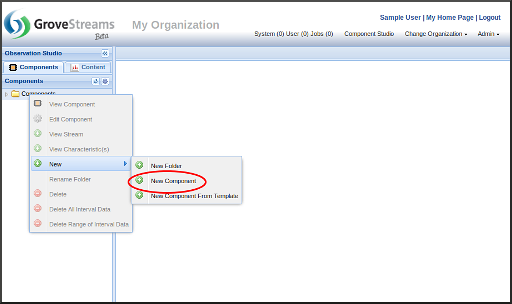
Right click on the Components folder and select New - Component
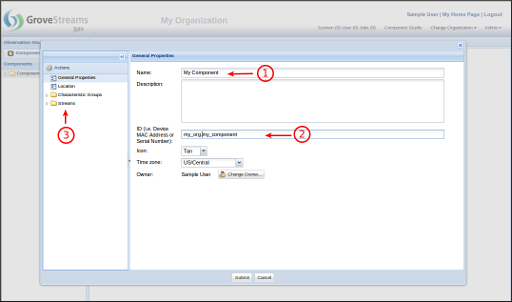
1. Enter a name for the component. It can be any name.
2. Set the ID to: "myOrg.myComponent". This will be used later in the feed upload code - step 5. You can change the ID, but it must match the ID used in the code below.
3. Right click on the Streams folder and select Add - Stream - Interval Stream.
Note that you could create a Point or regular stream. The below sample feed code will work with all three stream types.
If you do choose to create a Point or regular stream, then you can skip the the cycle creation and assignment steps below. Regular streams are more flexible as they do not require changing the model when the sample frequency is changed.
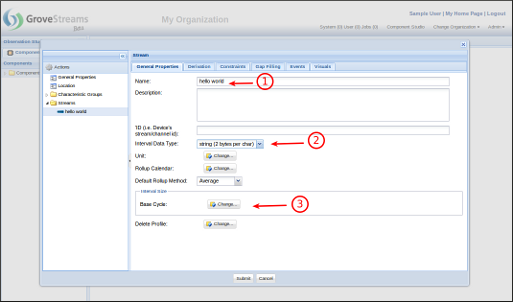
1. Enter a name for the new stream. It can be any name.
2. Select Data Type as string
3. Select a base cycle for the stream by clicking the Change... button
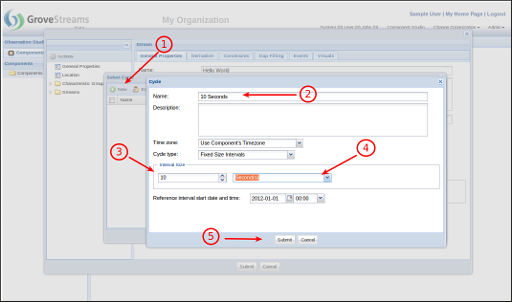
1. Click the New button to create a new cycle
2. Enter "10 Seconds" for the new cycle name
3. Enter "10" for the cycle size
4. Choose Seconds for the cycle size type
5. Save the new cycle
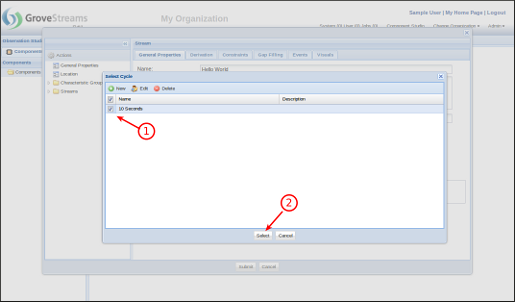
1. Select the newly created cycle
2. Click the Select button
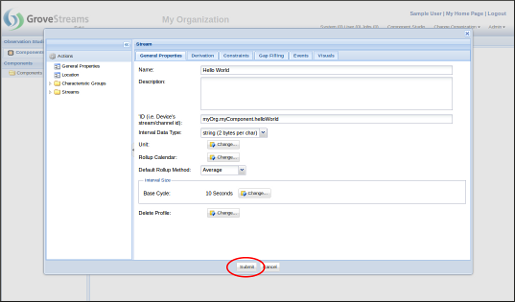
Click the Save button to save the newly created component and stream.
Step 4: Create an API Secret Key
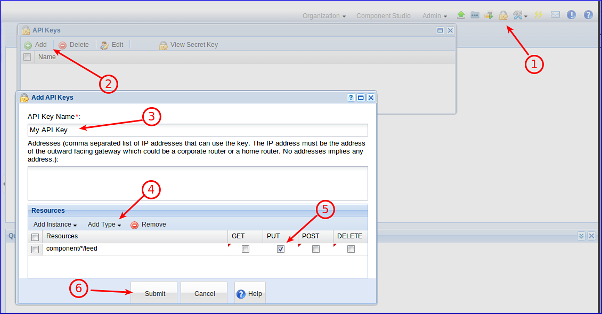
1. Click the API Keys button
2. Click the Add button 2. Enter a name for the new API Key. It can be any name.
4. Click the Add Type button and select component/*/feed
5. Ensure PUT is only selected
6. Click Save
This API key will give your GroveStreams API clients rights to upload feed data for all streams for this organization. This key could be restricted to certain IP addresses and/or to a specific stream, but for this example we will create a key that can be used for all feeds for this organization.
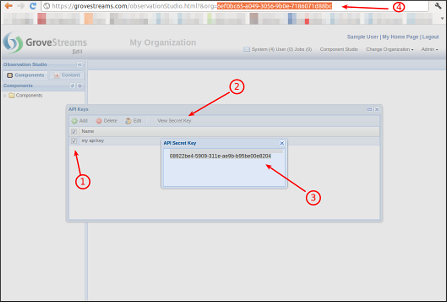
1. Select the newly created key
2. Click the View Secret Key button
3. You can select the secret key id and copy it to the clipboard (Ctrl-c) and paste it (Ctrl-v) into your feed code (Step 5 below)
Step 5: Create your stream feeder
The GroveStreams API is a Restful API and can be used by most programming languages. For this example we will use the Java programming language and we will use the simple feed PUT API which does not involve any JSON.
We highly recommend downloading and installing a free Java editor such as Eclipse.
1. Download and run Eclipse
2. Create a Java Project in Eclipse
3. Create a Java class called HelloWorld and copy the code below to this new class file
4. Right click on your Java Project and choose Build Path -
Configure Build Path, click on the libraries tab, choose Add
JARs (or Add External JARs, depending on where you placed
the required libraries) and add the required library jars
Required Libraries
commons-codec-1.4.jar
commons-httpclient-3.1.jar
commons-logging-1.1.1.jar
These libraries are free and can be found online at:
Code (Don't forget to replace the api_key token in
the code below with your Secret API Key!)
						import java.io.IOException;
 import java.net.URLEncoder;

						import java.text.SimpleDateFormat;
 import
						java.util.Calendar;
 import java.util.GregorianCalendar;


 import org.apache.commons.httpclient.HttpClient;

						import org.apache.commons.httpclient.HttpStatus;
 import
						org.apache.commons.httpclient.methods.PutMethod;


						public class HelloWorld {

     private static final
						String api_key = "YOUR_SECRET_API_KEY_HERE";
						//Change This!!!

     private static final String
						component_id = "myOrg.myComponent";

     public
						static void main(String[] args) {
         PutMethod
						putMethod = null;

         try {


						        // Connect to GroveStreams
             HttpClient
						httpClient = new HttpClient();


						while (true) {


						Calendar cal = new GregorianCalendar();


						                SimpleDateFormat sdf = new
						SimpleDateFormat("yyyy-MM-dd HH:mm:ss");

						String nowStr = sdf.format(cal.getTime());

						String data = "Hello World. The current time is: " + nowStr;


                 //URL encode the data text

						                data = URLEncoder.encode(data, "ISO-8859-1");

						                String url =
						String.format("http://grovestreams.com/api/feed?api_key=%s&compId=%s&data=%s",
						api_key, component_id, data);


						putMethod = new PutMethod(url);

						putMethod.setRequestHeader("Accept", "application/json");

						                putMethod.setRequestHeader("Content-type",
						"application/json");

                 //Upload the
						sample
                 int statusCode =
						httpClient.executeMethod(putMethod);
                 if
						(statusCode != HttpStatus.SC_OK) {

						System.out.println("Upload to grovestreams.com failure: " +
						putMethod.getStatusLine().toString());
                 }
						else {
                     System.out.println("Upload to
						grovestreams.com succeeded");
                 }


						                //Sleep 10 seconds

						Thread.sleep(10000);
             }

         }
						catch (IOException e) {

						System.out.println(e.getMessage());
         } catch
						(InterruptedException e) {

						System.out.println(e.getMessage());
         } finally {

						            // Release the connection
             if
						(putMethod != null) {

						putMethod.releaseConnection();
             }

						}
     }
 }
Step 6: Run your stream feeder
The easiest way to run your feeder is to run it from within Eclipse.
Right click your HelloWorld class and and choose Debug As - Java Application
Step 7: See your results
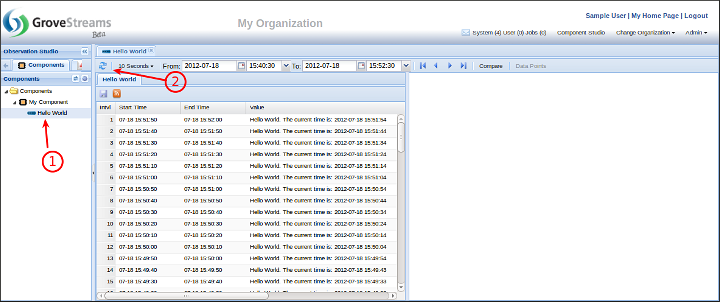
1. Double click the Hello World stream
2. Click the Refresh button to see the latest intervals
Congratulations! You have created your first feeder!
Now that you have a component and a stream, you can explore many other GroveStreams features such as:
- Dashboards and Maps
- Component and Stream Settings (right click on the component and choose Edit Component)
- Set the Component's fixed location
- Setup automatic gap filling
- Setup events
- Create derived streams
